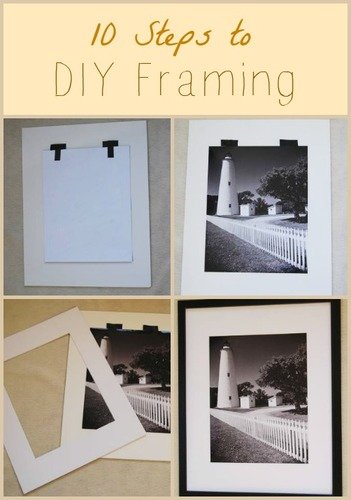
Today, we get DIY framing tips from landscape and wildlife photographer Pat McNulty. Read on to learn to frame a picture like a pro. How to Frame a Picture Like a Pro by Pat McNulty
Framing pictures can be a difficult proposition, but it is worth the effort to preserve art to keep it safe for years. Placing pictures on a wall can be one of the easiest ways to add a glint of quality and pride when staging a home. Take the mystery out of one of life’s many decorating challenges by using these insider secrets on how frame a picture like a pro.
- Select your artwork. It should be something you find appealing or valuable since you will be living with it for a long time. A photo can either be placed in a mat or directly into a frame.
- Go shopping to find a mat and a frame. Take a look at an arts and crafts store. Check out places like: Michaels, A.C. Moore, Deck the Walls, or The Great Frame Up. In choosing a mat and frame, see how each one will give you a different look. The mat and frame should enhance the picture or artwork. A benefit of using a mat is that it provides a buffer or space between the picture and the glass.
- Look for the proper size mat and frame. Select the frame size based on the mat size. Select the mat size based on the size of the picture and the amount of buffer you want between the photo and the frame.
A 5×7 photo can be placed in an 8×10 mat and 8×10 frame A 8×10 photo can be placed in an 11×14 mat and 11×14 frame A 11×14 photo can be placed inside a 16×20 mat and frame
Choose a frame and mat that complement your photo 4. Choose the right mat. The mat should be wider than the picture. You can choose to use a single mat (has no inner border) or a double mat (has an inner border). Choose the color to match the photo. You can choose a double mat, where the inside border of the mat brings out a color in a picture or artwork. To prevent damage to the photograph, only acid-free board should be used. The best mat board is made of 100% rag. Simple or elaborate, the mat must complement the artwork and not detract from it. Matting can be an art in itself. 5. Choose a frame. Select a frame that will complement the color scheme in the room where it will be hung. For example, with black & white pictures—a thin black frame goes well with a white or grey mat that has a black inside border. For sunset pictures, a red frame goes well with a white or cream-colored mat that has a red inside border. Together, the mat color and the frame should enhance the artwork and fit into the room where it is placed. 6. Assemble the tape. The next step is using either single-sided Scotch Photo and Document tape or single-sided Scotch Scrapbooking tape to secure the picture to the back of the acid free backboard or foam board with the tape. The picture will be hanging by two T-shaped pieces of tape, which will anchor the top of the picture to the back board. This technique helps prevent your picture from developing any ripples. The mat will be placed over the picture, and set into the frame. Do not use masking tape. Take two pieces of tape about two inches long. Make a T-shape with the two pieces of tape, sticky side to sticky side. 7. Attach the tape. Place the picture face down. Attach the vertical tail of the “T” to the picture, placing the tape on the top left side of the back of the picture. The horizontal top of the T-shape tape should be close to the edge of the picture but not touching the picture. Now make a second T-shape and repeat the above step, placing it on the top right side of the back of the picture. Now you will have two T-shapes on the left and right side of the top of the picture.
Tape in T-shapes helps secure your artwork 8. Secure the photo or document. Flip the picture over and center the picture on the back of the board. Press lightly in place.
Secure your artwork on the foam board 9. Attach the mat. Put the mat lightly over top of the picture. With the picture centered on the inside of the mat, take the two top portions of the T-shape and push the tape firmly on the back of the board or foam board.
Place the mat on top of your artwork 10. Hang your artwork. Place the mat on a clean surface. Put the picture, mat, and backboard into the picture frame. Hang your picture on the wall and enjoy!
Enjoy your framed artwork Pat McNulty is a landscape and wildlife photographer. He has extensive experience integrating framed images into home decor and shares some of the hard-won lessons he’s learned along the way. His website offers over 900 beautiful pictures and offers free screensavers, free decorating, and photography articles.

